微信小程序开发聊天室详解-实时聊天 支持图片预览
第一次写小程序,老板让我用websoket写聊天对话。第一次写聊天功能,第一次用websoket,第一次用小程序,你是在测试我吗?然而,我做了一些研究,最终实现了。
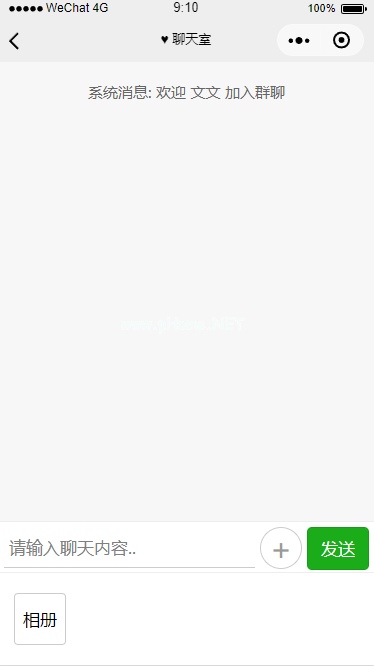
首先看界面,界面很简单,就是首页刚进来获取用户信息头像、昵称等等。点击进入聊天室聊天。下面我介绍的是前端代码实现。后台需要做的很简单,就是不管你给他发什么数据,他都会回你,也就是收到前台发过来的图片的时候,你需要做一个格式转换,因为有时候前端把收到的json字符串转换成json对象的时候,遇到特殊的标点符号可能会报错。比如我刚报了个错,找了很久。
因为有人咨询过,所有的小程序代码都附上了。地址:https://github.com/chongwenwen/weixin_chat/tree/master
有人说为什么没有utile.js的代码,这个函数只使用websoket.js,和utile.js没有关系!页面底部还有背景代码


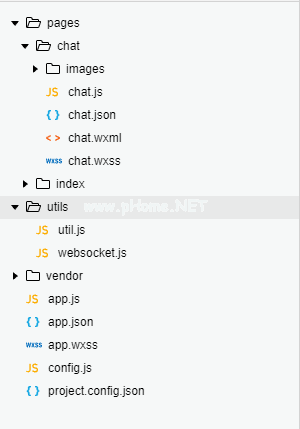
文档目录结构如下:(聊天页面为聊天)
Chat.wxml页面
首先,写页面结构。既然是群聊功能,肯定有自己和别人。因此,页面的视图框应该有两部分,一部分内容显示在左侧,另一部分内容显示在右侧,下面是代码。因为没有正式注册的企业项目,我使用的服务器都是本地服务器,所以界面通过昵称来区分别人和我的聊天信息。如果正式项目应该通过用户标签来区分,
view class=' news ' bind tap=' outt ' view class=' chat-note ' wx : if=' { { UserInfo } } '系统消息: 欢迎{{ userInfo.nickName }}加入群聊/view view class=' history con ' scroll-view scroll-y=' true ' class=' history ' scroll-top=' { { scroll top } } ' block wx : for=' { { news list } } ' wx : key!-历史消息- !-view class=' chat-news ' view style=' text-align : left;左填充left : 20 rpximage class=' new _ img ' src=' http : { { item }。头像网址?项目。头像网址: '图片/avator。png ' } '/image text class=' name ' { item。昵称} } { { item。date } }/text/view class=' you _ left ' block wx : if=' { { item。type=' text ' } ' view class=' new _ txt ' { item。content } }/view/block block wx : if=' { { item。type=' image ' } ' image class=' selecting '-自己的消息-view class=' chat-news ' wx : if=' { { item。昵称==userInfo。昵称} }“view style=”text-align : right;填充-右: 20 rpxtext class=' name“{ item。昵称} }/text image class=' new _ img ' src=' http : { { user info。头像URL } } '/图像/视图视图类=' my _ right ' block wx : if=' { { item。type=' text ' } } ' view class=' new _ txt ' { item。content } }/view/block wx : if=' { { item。type=' image ' } ' image class='-别人的消息-view class=' chat-news ' wx : else view style=' text-align : left;填充-左侧: 20 rpximage class=' new _ img ' src=' http : { { item }。头像网址?项目。头像网址: '图片/avator。png ' } '/image text class=' name ' { item。NiCKET } }/text/view view class=' you _ left ' block wx : if=' { { item。type=' text ' } ' view class=' new _ txt ' { item。content } }/view/block wx : if=' { { item。type=' image ' } ' image class=' selectImg ' src=' http 3-聊天输入-view class=' message ' form bind reset=' clean input ' class=' sendmail ' input type=' text ' placeholder='请输入聊天内容.value=' { { message } } ' bind input=' bind change '/input view class=' add ' bind tap='递增/view button type=' primary ' bind tap=' send ' formType=' reset ' size=' small ' button-hover=' blue '发送/button/窗体视图类='增加了{{aniStyle?向上滑动' : '向下滑动' } } ' wx : if=' { {增加} }“视图类=”图像”绑定点击=“选择图像”相册/view /view /viewwebsoket.js文件
在实用工具目录下,是封装了websoket的请求过程,以便在聊天。射流研究…中调用。需要注意的是wx.connectSocket代表客户端首次和服务器建立联系,wx.onSocketOpen才是正式打开通道,wx.onSocketMessage必须在wx。onscocketopen回调之后发送才生效。
wx.onSocketMessage里面带有参数是一个函数回调,这个回调就是后台服务器实时接收并返给前台的数据
var url='ws://. ';//服务器地址函数连接(用户,功能){ wx。connectsocket({ URL : URL,标头: { ' content-type ' : ' application/JSON ' }),success : function(){ console。日志('信道连接成功~') },失败:函数(){ console。日志('信道连接失败~ ')} })wx。onscocketopen(函数(res) { wx.showToast({ title: '信道已开通~ ',icon: 'success ',duration: 2000 }) //接受服务器消息wx。onscootmessage(func);//func回调可以拿到服务器返回的数据});wx.onSocketError(函数(res) { wx.showToast({ title: ')信道连接失败,请检查!',icon: "无",duration: 2000 }) }) } //发送消息函数发送(消息){ wx。sendsocketmessage({ data : msg });}模块。exports={ connect : connect,send: send }chat.js文件
在聊天室的逻辑操作页面,websocket.connect(){}调用websocket.js的逻辑函数,回调就是后台的数据。之所以在这个页面上调用它,是为了方便接收后续的逻辑操作。我创建文件的时候用的是微信官方快速模板生成的,所以app.js没有变化,用户在chat.js中得到userInfo的时候可以参考全局app.globaldata.userInfo

还有一点需要注意的是,当你选择发送图片时,必须先将本地图片地址发送到后台,转换成服务器的图片地址,通过wensoket.send再次发送到服务器,此时服务器会将正确的地址推送给其他用户,否则你的本地地址无法被其他用户访问。
//页面/聊天/聊天。js const app=GetApp()var web socket=require('././utils/web套接字。js’);var utils=require('././utils/util。js’);页面({ /***页面的初始数据*/data : { newlist :[],userInfo: {},scrollTop: 0,increase:false,//图片添加区域隐藏aniStyle: true,//动画效果消息: ' ',预览列表:[] },/***生命周期函数-监听页面加载*/onLoad:函数(){ var=this if(app。GlobalDATA。UserInfo){这个。setdata({ UserInfo : app。GlobalDATA。UserInfo })}//调通接口web套接字。连接(这个。数据。userinfo,函数(RES){//控制台。日志(JSON。解析(RES . data))var list=[]list=那个。数据。新列表。推送(JSON。解析(RES . data))该。setdata({ newlist : list })})},//页面卸载onUnload(){ wx。close socket();wx.showToast({ title: '连接已断开~ ',icon: 'none ',duration: 2000 }) },//事件处理函数send :函数(){ var flag=this if(this。数据。消息。trim()==' '){ wx。showtoast({ title : '消息不能为空哦~ ',icon: 'none ',duration 3360 2000 })else { setTimeout(function(){ flag }。setdata({ incremente : false })},500)web套接字。发送({ ' content ' : ' ' this。数据。消息“”,日期“:”实用程序。格式化时间(新日期())',键入' : '文本','昵称3: ' '这个。数据。用户信息。昵称。监听投入值的改变绑定更改(RES){ this。setdata({ message : RES . detail。value })},cleanInput(){ //button会自动清空,所以不能再次清空而是应该给他设置目前的投入值这个。setdata({ message : this。数据。message })},increment(){ this。setdata({ incremente : true,aniStyle: true }) },//点击空白隐藏消息下选框outn(){ this。setdata({ incremente : false,aniStyle: true }) },//发送图片选择image(){ var=this wx。选择图像({ count : 1,//默认9尺寸类型: ['原始','压缩'],//可以指定是原图还是压缩图,默认二者都有sourceType: ['相册','相机'],//可以指定来源是相册还是相机,默认二者都有成功:函数(res) { //返回选定照片的本地文件路径列表,tempFilePath可以作为图片标签的科学研究委员会属性显示图片var tempfile路径=RES . tempfile路径//console。日志(临时文件路径)wx。上传文件({ URL : ' http://.' , //服务器地址文件路径:临时文件路径[0],名称: '文件',头RS : { '内容-类型' : '表单-数据' },成功:函数(RES){ if(RES . data){ that。setdata({ incremente : false })web套接字。发送(' { ' images ' : ' ' RES . data ' ',' Date ' : ' ' utils。格式化时间(新日期())','类型' :图片预览previewImg(e){ var=this//必须给对应的页面结构的图像标签设置数据集="图片路径",否则接收不到var RES=e . target。数据集。src var列表=这个。数据。previewimglist//页面的图片集合数组//判断表示留数在数组中是否存在,不存在则推到数组中, -1表示表示留数不存在if(列表。indexof(RES)==-1){ this。数据。预览列表。push(RES)} wx。预览图像({当前3360 RES,//当前显示图片的超文本传送协议(超文本传输协议的缩写)链接网址:数据。previewmglist//需要预览的图片超文本传送协议(超文本传输协议的缩写)链接列表}) }, //聊天消息始终显示最底端底部:函数(){ var query=wx。createselectorquery()。查询。选择(' # flag ').boundingClientRect()查询。选择视口().scrollOffset()。查询。exec()函数(RES){ wx。页面滚动到({滚动顶部: RES[0]).底部/节点的下边界坐标}) res[1].scrollTop //显示区域的竖直滚动位置}) }, })最后是页面的样式文件chat.wxss
/*页面/聊天/聊天。wxss */page {底色: # f7f 7;高度: 100%;} /* 聊天内容*/.新闻{ padding-top : 30 rpx;文本对齐:中心;/*高度:100%;*/盒尺寸:边框-盒子;} # flag { margin-bottom : 100 rpx;高度: 30rpx}。聊天-通知{ text-align :居中;font-size : 30 rpxpadd : 10 rpx 0;color: # 666}。历史con {高度: 100%;宽度: 100%;/*灵活方向:列;*/显示: flex边框-顶部: 0px} /* 聊天*/.聊天-新闻{宽度: 100%;飞越:隐藏;} .聊天新闻my _ right { float : right/* right : 40 rpx;*/padd : 10 rpx 10 rpx;} .聊天新闻名称{右边距: 10 rpx} .聊天新闻you _ left { float : left/* left : 5rpx;*/padd : 10 rpx 10 rpx;} .选择{显示:内嵌块;宽度: 150 rpx高度: 150 rpx左边距left: 50rpx}。我的右边。选择{右边距: 80 rpx} .new _ img { width : 60 rpxhire : 60 rpx边界半径: 50%;垂直对齐: 中间;右边距: 10 rpx} .new _ txt { max-width : 300 rpx;显示器:内联块;边界半径: 6rpx线高: 60 rpx背景-颜色: # 95d 4ffpadd : 5 rpx 20 rpxmargin : 0 10 rpx左边距left: 50rpx}。我的右边new _ txt { margin-right :60 rpx;} .您{背景色:浅绿色;} .我的{边框颜色:透明透明透明# 95d4ff}。您{边框-颜色:透明# 95d 4ff透明透明;} .hei { margin-top : 50px;高度: 20rpx}。历史{身高: 100%;页边距-top : 15px;padd : 10 rpx font-size : 14px;线高: 40px断字:断字;} :-web工具包-滚动条{ width : 0;高度: 0;颜色:透明;z指数:-1;} /* 信息输入区域*/.消息{位置:已修复;底部:0;宽度: 100%;} .发送消息{ display:块;高: 80 rpxpadding : 10 rpx 10 rpx背景-color : # fff;边框-top: 2rpx实心# eeeborder-bottom: 2rpx实心# eeez索引:3;} .发送消息输入{ float:left宽度: 66%;高度: 100%;线高: 80 rpx边框-底部: 1rpx实心# cccpadding :0 10 rpx font-size : 35 rpx;color: # 666}。发送消息视图{显示:内联块;宽度: 80 rpx高度: 80rpx线高: 80 rpxfont-size : 60 rpx文本对齐:中心;color: # 999border: 1rpx固体# ccc边界半径: 50%;左边距left: 10rpx}。发送消息按钮{右侧浮动:font-size : 35 rpx} .增加{宽度:100%;/*高度: 150 rpx*/padd : 40 rpx 30 rpx;背景-color : # fff;} .增加了。图像{ width: 100rpx高度: 100 rpxborder: 3rpx固体# ccc线高: 100 rpx文本对齐:中心;边界半径: 8 rpxfont-size :35 rpx} @关键帧从{ transform: translateY(0)向下滑动;}到{ transform : translateY(100%);} } .下滑{ animation:下滑0.5s线性;} .向上滑动{ animate :向上滑动0.5s线性;} @关键帧向上滑动{来自{ transform : translateY(100%);}到{ transform : translateY(0);} }后台代码(图片):

以上所述是小编给大家介绍的微信小程序实时聊天支持图片预览详解整合,希望对大家有所帮助,如果大家有任何疑问请给我留言,小编会及时回复大家的。在此也非常感谢大家对我们网站的支持!
版权声明:微信小程序开发聊天室详解-实时聊天 支持图片预览是由宝哥软件园云端程序自动收集整理而来。如果本文侵犯了你的权益,请联系本站底部QQ或者邮箱删除。